Invoicing with QuickBooks Online
Here you will learn how to track time in TMetric, sync it to QuickBooks Online and create invoices for the work you've done.
If you have a QuickBooks Online account, you can create invoices from it, preliminary syncing time from TMetric. Let's see how it works.
How to sync time
To enable time synchronization between TMetric and QuickBooks Online, you need to create a new integration between these systems.
Time tracked in TMetric can be synchronized with QuickBooks both automatically and manually. You can enable the Synchronize time automatically option or click the Synchronize Time Now button correspondingly.
During the first synchronization, TMetric synchronizes only the time logged from the date when the integration is created.
If time entries are successfully synced, you will see an appropriate message in the status box.

How to create an invoice
When a time entry is synched from TMetric to QuickBooks, its data is populated into the corresponding fields of a time activity in QuickBooks Online. You can learn more about how data is matched in the Data synchronization overview section of this article.
When time is synced to QuickBooks Online, you can create an invoice to bill your client for your services.
To quickly create an invoice in QuickBooks Online, you need to enable automatic invoicing for unbilled time activities:
- Sign in to your QuickBooks Online account.
- Go to Settings.
- Select Account and Settings, and then Advanced.
- In the Automation section, click the Edit icon.
- Check Automatically invoice unbilled activity, make necessary changes in the options and click Save.
To create an invoice in QuickBooks Online
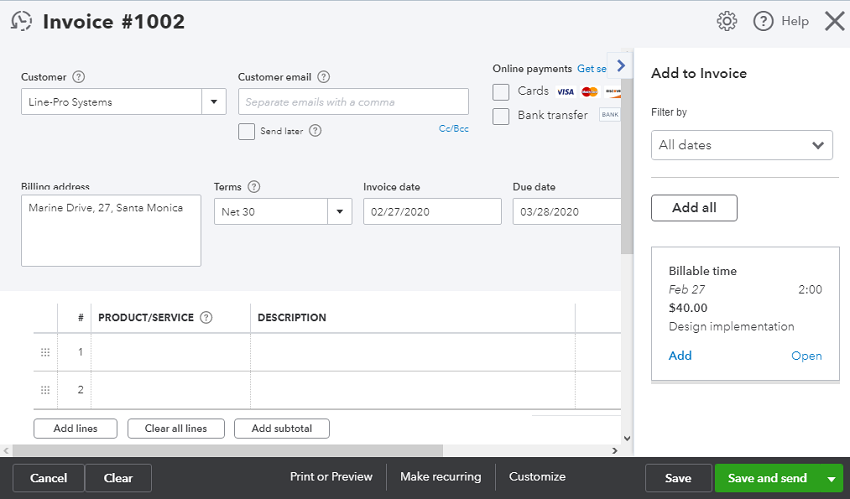
1. On the Home page of QuickBooks Online, click the + New and then Invoice.
2. In the Customer drop-down list, select the customer's name you're creating an invoice for.
3. On the left side, you will see the panel with unbilled time activities for this customer.

4. Click the Add button on the time entry you want to add to the invoice.
5. When you're done, at the bottom-right corner of the page, click either Save (to save the invoice) or Save and send (to choose other Save actions).
Didn’t find what you were looking for?
If you didn't find what you were looking for, you can make a support request or email us to [email protected]. We'll be glad to help you personally.