Managing Time Off Requests
This article gives you tips and tricks on how to quickly edit, approve, deny and delete time-off requests. You will also find out how to filter and group requests to easily manage the ones you need.
Time Off Calendar provides a convenient and quick way to view your own time off and time off of your employees. It shows all upcoming, planned, and used days off. Also, there is a possibility to approve/deny time-off requests directly there.
Users can see other members' requests if they belong to one team. A workspace admin and owner get all permissions to manage time-off requests. A team lead possesses the same rights as a regular user.
Approving or denying time off requests
Once a time off request is created, it should be either approved or denied. Only those requests whose policy requires confirmation (with a Needs Approval status) are sent for approval. If a policy doesn't require approval, requests get an Approved status right after they are created.
A time off request can be approved or declined by a user who is selected as an Approver or by a user with admin rights. There are several ways to do it: from the Time Off Requests page, from an email notification, or directly from the Time Off Calendar, which is the fastest way. So, let's see how to do it.
To approve/deny a time request using the calendar
1. Navigate to Time Off on the main menu, and then click Calendar.
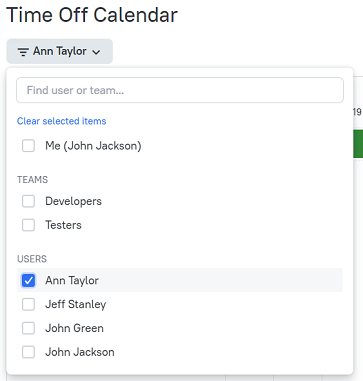
2. On the Time Off Calendar page, find a member whose request you want to approve. Use the Team filter to quickly find the member you need.
3. Click the vacation you want to approve/deny (unapproved time-off requests are marked with stripes).
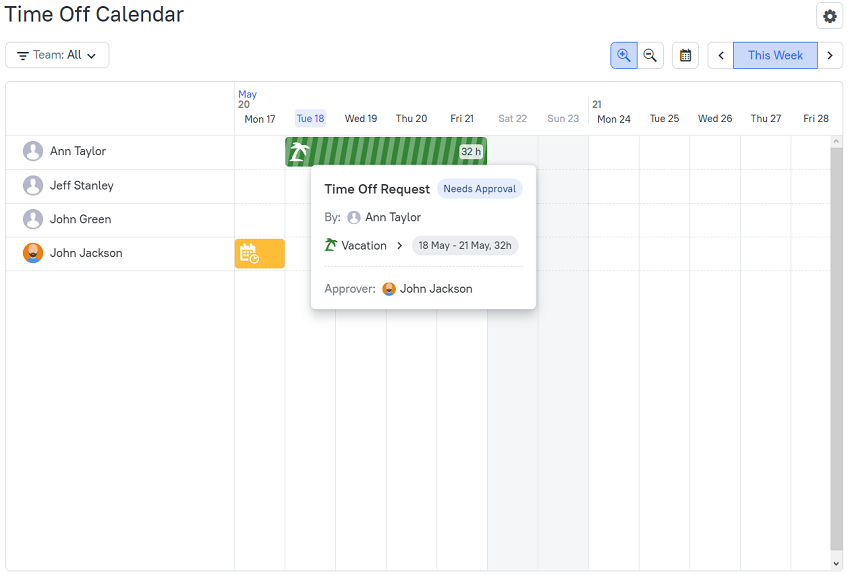
4. Click either Approve or Deny depending on what you want to do with the request.
5. The request changes the Needs Approval status to either Approved or Denied depending on the action you apply.
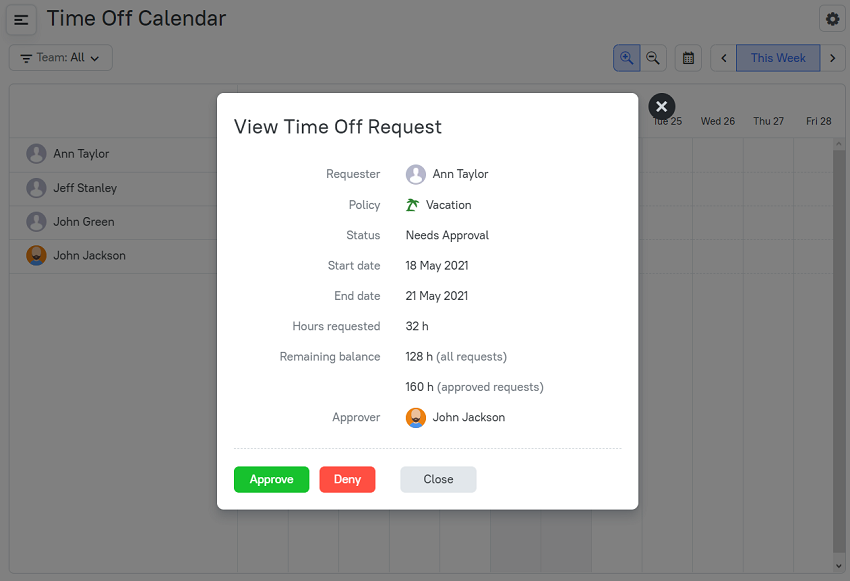
Note: You can also approve/deny a request via the View Time Off Request dialog box on the Requests page. For this, just click a request you need and an action you want to apply to it.
To approve/deny a request from an email notification
Once a time off request is submitted, an email notification is sent to Approver. It is possible to approve/deny it through the dialog box in the email:
1. Open your mailbox and find a corresponding email.
2. When you open an email notification, you will see the dialog box shown on the screenshot below.
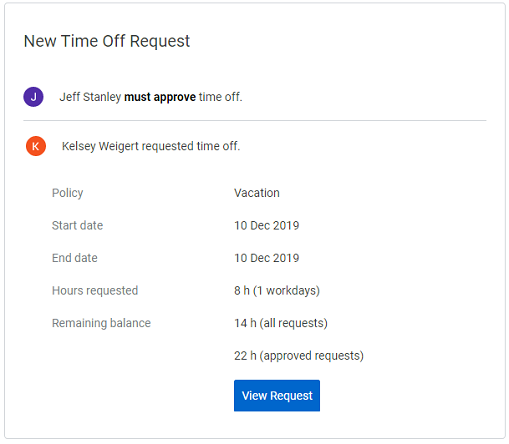
3. Click the View Request button.
4. In the opened dialog box, click either Approve or Deny. The request changes its status.
5. An email notification is sent to Requester either with approval or denial.
Note: If a request is approved/denied by a user with admin rights instead of a user who is specified in the Approver field, Approver is changed to a user who applies an action. When denying a request, a user must specify a reason for this.
Editing time off requests
A time off request can be changed only by a person who creates it or by a workspace admin. You can only edit time-off requests with the Needs Approval and Denied statuses.
After a request is successfully edited, an email notification is sent from a user who makes changes (regardless of the Requester field).
If the Approver field is changed, an email notification is sent to both users: a previous approver and a new one.
When a Denied request is edited, it changes its status to Needs Approval.
To edit a time-off request
1. Open the Time Off Requests page, find a request you want to edit and click the overflow menu.
2. Click the menu next to the request name you want to edit, and then select Edit.
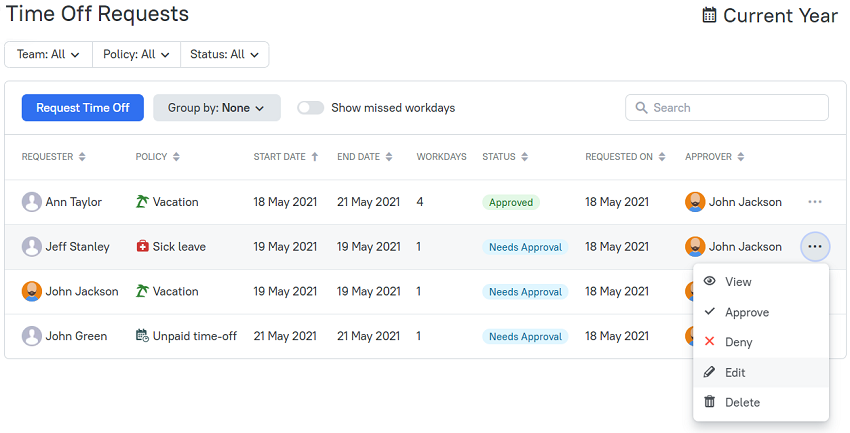
3. The Edit Time Off Request dialog box opens where you can make all the changes you need.
4. Click Save.
Showing Missed Workdays
Time Off Calendar also displays all workdays that your employees missed. This option allows keeping track of employee absences and reporting missed time from work in a convenient way. When a user opens a New Time Off Request dialog, the missed workdays are displayed in the Period field.
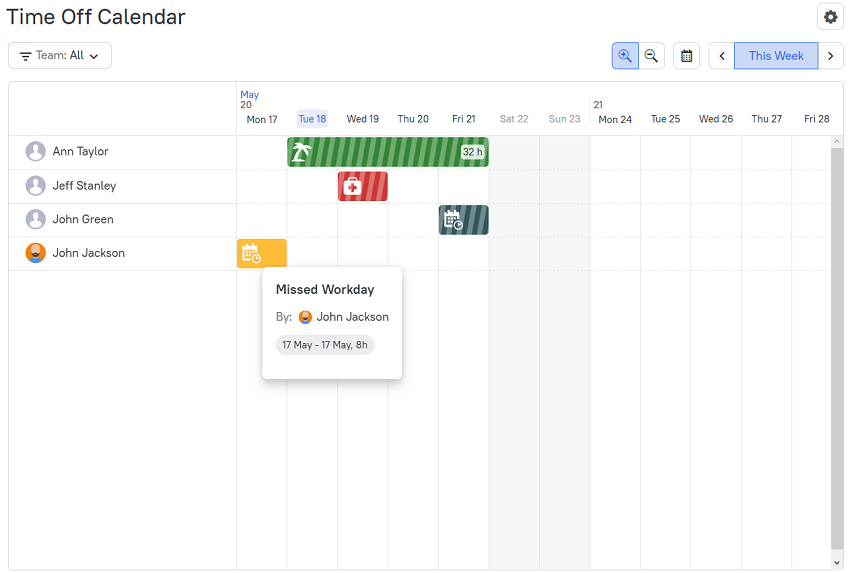
Note: On the Time Off Requests page, you can also see employees' missed workdays by enabling the Show missed workdays option (by default, it is off).
Filtering and grouping time off requests
When there are multiple time-off requests in the list, with filters, you can easily find the one you need. On the Requests page, you can filter the list by Team, Policy, and Status. Also, you can set a time range in the date picker to display requests for a specific date.
You can group data in the table using the following categories: Requester, Policy, and Approver. Just click the Group by button and select a category you need.
Deleting time off requests
A time off request can be deleted either by a user on behalf of which it is created or by a user with admin rights who has permission to delete requests with any statuses.
A Requester can delete only those time-off requests, which are submitted under a policy that does not require approval. He is also allowed to delete requests that relate to the future.
To delete a time-off request
1. On the Time Off Requests page, find a request you want to delete.
2. Click the overflow menu on the right and select Delete.
3. Confirm the deletion.
Didn’t find what you were looking for?
If you didn't find what you were looking for, you can make a support request or email us to [email protected]. We'll be glad to help you personally.