Jira Software: Synchronizing Time
Jira is an issue tracking and project management system. You can configure TMetric to automatically upload data to Jira Software, so you can benefit from using both TMetric and Jira in your workflow.
Note: Jira time synchronization is only available in the Business plan.
Table of Contents
- How to install TMetric browser extension
- How to configure time sync with Jira
- How to track time in Jira
- How to edit and delete Jira integration
- Adjust remaining estimates of issues automatically
In order for synchronization to work correctly:
- Each team member should install the TMetric browser extension.
- Time sync with Jira should be properly configured.
- Time is tracked with a timer button built into Jira.
How to install TMetric browser extension
To integrate TMetric with Jira, the first thing you should do is to install the TMetric extension. Just choose the browser you prefer in the list below, click the link and add the extension to it.
- TMetric Chrome extension
- TMetric Firefox add-on
- TMetric Edge Extension
- TMetric Opera add-on
- TMetric Safari Extension
After successful installation, the TMetric icon will appear on the upper toolbar.
How to configure time sync with Jira
To integrate Jira Cloud with TMetric, do the following:
1. Go to Workspace and click Integrations.
2. Click New Integration and select Jira.
3. Enter your Jira instance URL.
4. In the Hosting drop-down list, select Cloud.
5. Click the link to install TMetric app (add-on) to your Jira instance.
Note: A user who installs the TMetric add-on must be the one who enables synchronization in TMetric.
6. After installing the TMetric add-on, go back to TMetric and click the Refresh Page button.
7. To avoid synchronization errors, you should allow editing of closed issue in Jira.
8. Click Enable synchronization of tracked time.
To integrate Jira Server / Data Center with TMetric, do the following:
1. Repeat the first three steps above.
2. In the Hosting drop-down list, select Server / Data Center.
3. Click the link to install TMetric app (add-on to your Jira instance.
Note: A user who installs the TMetric add-on must be the one who enables synchronization in TMetric.
4. Create an application link in your Jira instance by following the Add application link steps.
5. After the application link is added in Jira, go back to TMetric and click the Authorize TMetric button.
6. To avoid synchronization errors, you should allow editing of closed issue in Jira.
7. Click Enable synchronization of tracked time.
Note: An alternative way to configure synchronization is to first start the TMetric timer in your Jira instance, this will automatically create the Jira integration on the Integrations page in your TMetric workspace.
Time synchronization starts immediately after you click Enable synchronization of tracked time. Time entries are synchronized automatically every hour, unless you initiate synchronization manually on the Integrations page. Only time entries that were created in Jira are synchronized.
If you change the time interval that has been already synchronized, this change will be uploaded to Jira in the next synchronization.
The time of the active task will be synchronized to Jira after you stop the timer on this task.
Any synchronization issues can be traced in the TMetric Log.
How to track time in Jira
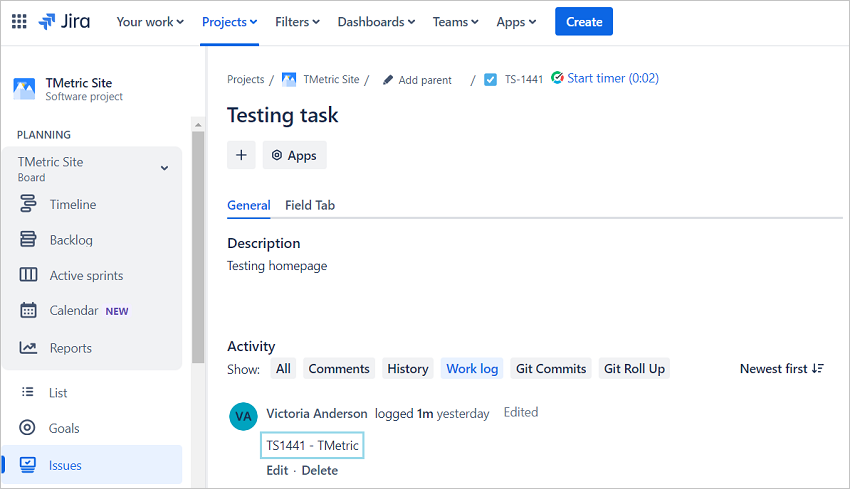
The TMetric extension you have installed adds the Start timer button on a Jira issue page. Click the button and the corresponding time entry will appear on TMetric timesheet with the same ID as in Jira. The ID is a link that takes you to the relevant Jira issue page. The time displayed on the Start timer button is the total time spent by all members of a team working on this issue.
The time logged in TMetric is synchronized automatically to Jira every hour and can be viewed in the Jira Work log.
Note: In order for your time to be successfully synchronized to Jira, you must be logged in to TMetric account under the same email as in Jira.

How to edit and delete Jira integration
You can view and edit all your Jira integrations on the Integrations page.
On this page, you can:
- Run an immediate synchronization by clicking the Sync Time Now button. In this case, the next synchronization will be exactly one hour away from the time you synchronized.
- View log to see the results of synchronization
- Edit the integration settings
- Delete an integration.
Note: When you delete an integration, all time entries associated with this integration will be unassigned from the relevant Jira instance.
Adjust remaining estimates of issues automatically
When synchronizing time between TMetric and Jira, you can also control the behavior of the Remaining Estimate field in Jira issues.
When you turn the Adjust remaining estimates of issues automatically option on, the Remaining field value will be reduced by the logged time on a Jira issue in TMetric.
Didn’t find what you were looking for?
If you didn't find what you were looking for, you can make a support request or email us to [email protected]. We'll be glad to help you personally.


