Adding and Editing Time
This topic walks you through the basics of tracking work time with TMetric and covers the following:
- What is a Time Entry
- Adding Time with Timer
- How to Continue a Task
- Adding a Time Entry Manually
- Adding a Break
- How to Edit or Delete a Time Entry
- How to Edit Multiple Time Entries at Once
Before you start recording the time, a common workflow will be to create a project(s) and add clients you work for.
What is a Time Entry
When working with TMetric, users sometimes mix up two things - a task and time entry. So let's make it clear:
- Task represents work that a user does.
- Time Entry is a continuous span of working time during which a user was performing one Task.
TMetric tracks the time spent on task execution, with the ability to link one task with several Time Entries.
Adding Time with Timer
The timer may be started either within the app or from an external web service, with which TMetric is integrated. There is also a possibility to start the timer from an internal task.
Time tracking within the app
To start the timer within the app, click the Start timer button (a green play button in the top menu panel). A new empty time entry is automatically created in the timesheet, and the timeline gets recorded. By default, TMetric creates a time entry with no description. You can add or change the task details later, while the timer is running.
Note: You can log your time only for the projects, in which you are a member.

Stop time recording by clicking the Stop timer button (the grey play button next to the Start timer one).
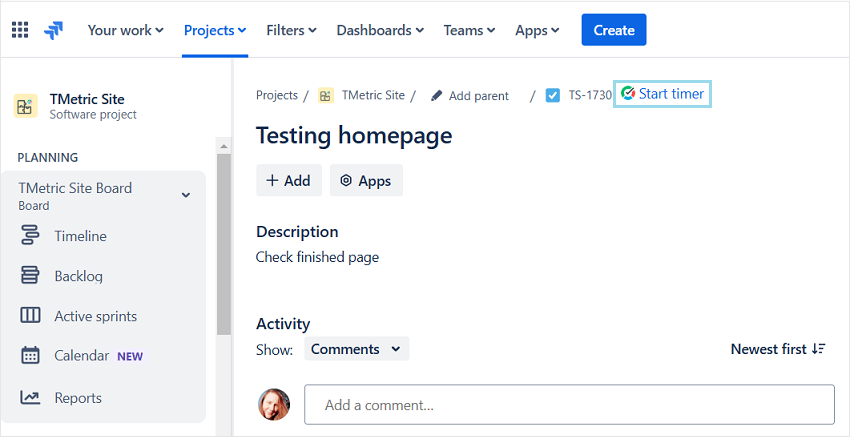
Time tracking from an internal task
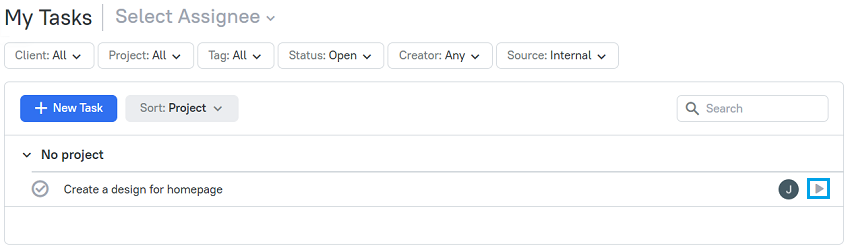
You can also start the timer from a task created in TMetric. Just click the Start timer for this task button on a task you need. And the time entry associated with the task will appear on the timesheet.
Time tracking from an external web service
TMetric integrates with the most popular web apps, so you can track time in TMetric without leaving your favorite app. Once you integrate TMetric with a web app, the Start timer button appears on the app interface. Just click it to start tracking the time you spent on external tasks.
How to continue a Task
If you want to proceed with a task you already worked on, hover over the corresponding time entry on the timesheet and click the Continue task button (a green play button on the right side of the time entry). A new time entry will be automatically created with the same description, project, tags, and billing settings.

Adding a Time Entry Manually
TMetric allows you to add a time entry whenever you need it. To add time, you can use either the timeline or the Add Time Entry button.
Using the Add Time Entry button
1. Click the Add Time Entry button on the top of the timesheet.
2. Describe your task, select a project and tags for it.
3. Enter the start time and the end time. You can do this by entering the numbers manually or clicking the clock icon next to the start/end time to open a clock dial. On the clock dial, select the necessary hour and minutes using only the mouse pointer.
4. Click Save.
Note: You can leave the dialog box empty and specify the details later. In this case, just click Start.

Using Timeline
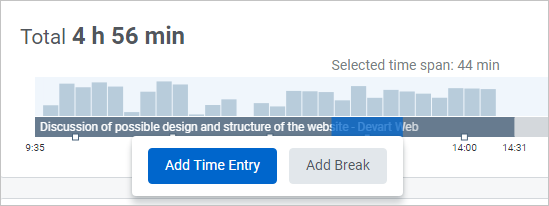
1. Select a time span on the timeline using the mouse pointer and click Add Time Entry.
2. Repeat steps 2-4 described above.
Note: When selecting a time span on the timeline, you do not need to specify task duration manually - TMetric does it automatically.
Adding time later
Let's take a look at a situation at hand. You were so busy all day and forgot to enter tasks you've been working on in TMetric. TMetric allows you to do this later.
To add time later:
- Click the Add Time Entry button or select a time span on the timeline. A new time entry dialog box appears.
- Enter the task description.
- Select a project from the drop-down list (optionally).
- Enter a duration of time (by default, TMetric sets 8 am as a start time). You can do it in two ways:
- specify the start time and the end time. In our case, the start time is 3:16 pm and the end time is 6:24 pm.
- specify the start time, and then enter the total duration of the task. In our case, the total duration is 3 h 8 min.
- Click Save.
Adding a Break
To add a break, you can use either the timeline or the Add Break button.
Using the Add Break button
1. Click the Add Break button on the top of the timesheet.
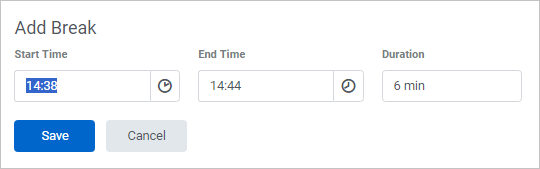
2. Specify the start time and the end time of the break either manually or using the clock dials.
Using Timeline
1. Select a time span on the timeline using the mouse pointer and click Add Break.
2. Specify the start time and the end time of the break either manually or using the clock dials.
Note: When selecting a time span on the timeline, you do not need to specify task duration manually - TMetric does it automatically.
The summarized break time during your working day is displayed above the timeline.
How to Edit or Delete a Time Entry
To edit time entry
1. Click the time span relating to a time entry on the timeline and click Edit Time Entry.
2. Another way is to click the time entry on the timesheet.
3. In both cases, a time entry dialog box will open, where you can edit the description, project, tags, start time and end time, as well as unlink the time entry from the external task.

You can easily edit or delete any time spans on the timeline using only the mouse pointer.
To delete a time entry
1. Click the time span relating to a time entry on the timeline and click Delete Time Entry.

2. Another way is to select a check-box next to the time entry on the timesheet and then click the Delete button in the menu that appeared.

Merging time entries
There may be a situation when you need to merge two or more time entries into one or add a portion of time to a different time entry. For example, if you started to work on a new task, but you forgot to start the timer for it.
To merge several time entries:
- Select a required time span of the timeline by clicking and dragging to highlight it using a mouse pointer.
- Select the required action in the dialog box:
- To merge time entries, click Add Time Entry. Specify the task details and click Save.
- To delete time entries, click Add Break.
Note: When you click Add Break, the user activity for the selected time span will be erased.

How to Edit Multiple Time Entries at Once
The bulk editing feature lets you quickly edit multiple time entries at once.
When selecting the entries you wish to edit, the bulk editing menu will show up where you can see the number and the total time of the selected time entries. The changes you make in the bulk editing menu will affect all the selected time entries.
Use the bulk editing menu to:
- Add a project to time entries
- Add tags to time entries
- Change the description of time entries and make them billable
- Delete time entries
Note: After you edit time entries, you will not be able to restore the original time entry details.

See Also
Didn’t find what you were looking for?
If you didn't find what you were looking for, you can make a support request or email us to [email protected]. We'll be glad to help you personally.